Friday, December 09, 2016

Sports & Workout Injuries: Should You Use Heat Or Cold?

If you've played a sport or worked out, you've slapped an ice pack on a sore knee or shoulder at some point. Learn why cold isn't always the best way to treat an injury. Remember the last time you strained your lower back doing a heavy set of curls? Or that nagging elbow pain that reappears every time you train biceps? Or even that muscle soreness you experienced a couple of days after that monster leg workout? 
Weightlifters, like many other athletes, often suffer injuries to muscles, tendons, ligaments, or other soft tissues. Some injuries come and go in relatively short order. Other injuries hang around—they never quite heal and are easily aggravated by further activity. But whether an injury is acute or chronic, it requires quick and proper care if you want to minimize your downtime. Some of the more commonly prescribed treatments are the application of cold and ice (cryotherapy) or heat (thermotherapy). Since these treatment methods don't require a medical prescription and are easily accessible with minimal risks, athletes use them frequently. The question is, which is best for a given injury: heat or cold?

How Pain Signals Work: When tissue is damaged, nerves send messages to the brain that are perceived as pain. Simultaneously, chemical messengers known as neurotransmitters begin a reflex that may lead to muscle spasms in the surrounding area. These spasms can potentially cause more tissue damage because of decreased blood flow to the area, and that can create more pain. The pain-spasm-pain cycle continues and can increase the degree of pain. It can also decrease mobility, sometimes markedly.
To prevent further injury and pain, you'll need to jump into action. Both hot and cold treatments are effective at reducing pain and muscle spasms. They both stimulate temperature-sensitive nerve endings, inhibiting the transmission of pain signals to the brain. Although both heat and ice can help block the pain-spasm-pain cycle, each provides an opposite effect on tissue metabolism, blood flow, inflammation, edema (swelling caused by excess fluid), the speed of nerve impulses (nerve conduction velocity), and your muscles' ability to stretch.
When and How to Use Cold: Effective cryotherapy should decrease the tissue temperature about an inch or more below the skin by 18-27 degrees F. This causes a narrowing of the blood vessels, and the resulting decrease in blood flow reduces tissue metabolism, oxygen use, edema, and inflammation. Nerve conduction slows down, while tolerance of pain goes up.
Despite its effects on blood flow and inflammation, limited research exists supporting its use in the management of acute injuries or delayed-onset muscle soreness (DOMS). Furthermore, there's a lack of evidence suggesting it can be a useful tool in speeding up recovery time.

How to Use: Ice bags, cold packs, frozen veggies, and direct-contact ice massage are commonly used. Finely crushed ice in a large bag or frozen veggies are easy to use and mold to your body's contours. Ice packs also work well and may also mold. Direct-contact ice massage penetrates quickly and deeply, but it isn't suitable for all individuals or circumstances. Icing is typically uncomfortable for the first 3-5 minutes, but it should never be unbearable. Treatment time should last 15-20 minutes; however, direct-contact ice massage should be applied for only 5-10 minutes. Cold therapy may be re-applied every two hours. A thin layer of fabric, such as a pillow case, should be used between the skin and the cold pack.
When to Use: Apply cold within 48-72 hours of acute trauma to any body part except the low back. It can also be used for the management of chronic pain after activity (like a baseball pitcher after the game) and inflammation such as swelling. Do not use cold if you have overly sensitive skin (eczema, dermatitis) or areas of poor circulation. Be especially careful when treating areas with poor blood flow, if you have known cold allergies, or if you have advanced diabetes. A lack of sensation resulting from diabetes-related nerve damage could lead to an excessive application of cold.
When and How to Use Heat: Thermotherapy increases tissue temperature, causing vasodilation, or widening of the blood vessels, which can increase blood flow to the injured area. Research suggests increased blood flow improves tissue healing by supplying oxygen, protein, and nutrients to the site of the injury.

As with cryotherapy, there's limited evidence supporting the claims that heat therapy is effective at improving an athlete's return to participation. But research has shown positive findings on the efficacy of thermotherapy for pain relief in patients with acute low-back pain.

How to Use: Dry heat packs, moist hot packs, or hot baths can be used. Localized moist heat tends to penetrate better and may avoid drying your skin. The heat should be warm but tolerable—not too hot. It's best to maintain a consistent temperature during treatment. It's recommended that tissue temperature reach 104-113 degrees F. Treatment time should last 15-30 minutes, depending on tissue thickness and type of injury.
Areas with thicker tissue, more spasticity, or both may require up to 30 minutes. Heat may be re-applied every two hours. Layers should be used to avoid burning your skin. Alternating between heat and cold has not been shown to be conclusively effective.
When to Use: Apply heat for acute low-back pain (short-term injury), injuries persisting for longer than 72 hours, relief of muscle spasms where inflammation is not present, and menstrual pain. Do not use immediately after exercise except for low-back pain and injuries where inflammation is present. Use special precautions when treating individuals with diabetes, spinal-cord injuries, and multiple sclerosis. Nerve damage from those diseases can lead to the overapplication of heat.
Remember, injuries that continue to prohibit the performance of normal activities should be followed up with a visit to a qualified health-care professional such as a physician, certified athletic trainer, or physical therapist. These injuries must be properly assessed and treated so that they don't worsen. Self-treatment via the use of thermotherapy, cryotherapy, or both is effective for the short term, but not the long term.


Sunday, December 04, 2016

Old School Cool: 8 Exercises That Deserve To Be Remembered


The Buff Dudes reach back into the past to find some oldie-but-goodie exercises that are almost gone but shouldn't be forgotten. Get hip to moves like the Zercher squat and the Otis-up.
Muscle cars, Steve McQueen, and Zercher squats. What do these three things have in common? They're old school cool—gone, but not forgotten. Well, we're bringing back Zercher squats and seven other old-school exercises, and we're doing it in a big way.
Bust out that Black Sabbath eight track, throw on your Rocky Balboa sweat pants, and let's make old school cool again.

Zercher Squats

If you've never tried a Zercher squat before, you're in for a real treat. Yes, at first this exercise can be an uncomfortable position to squat in. But with practice and the willpower to push through the pain, you'll reap some serious benefits. Here are just a few:
  • It increases upper-back activation, including your trapezius, rhomboids, and rear deltoids.
  • It works your core overtime to stabilize your spine.
  • It's an easier way to get in the full-squat or "ass to grass" position.
  • It forces both your quads and glutes to do more work than other squat variations.
  • It builds some serious biceps. Since you're holding the barbell in the crook of your arms, your biceps are forced into an isometric contraction, which will increase their strength and size.
How to Perform Zercher Squats - Leg Squat Exercise

Zercher Squat Technique

Step 1: Walk up to a squat rack with the barbell placed about waist high. With your elbows at your sides, place the barbell in the crook of your arms. Flex your elbow joints, clasp your hands together, and squeeze that barbell tight against you like it's your very own "Precious... My Precious."
Step 2: Unrack the barbell and walk back half a step. Keep your stance wide, with your feet pointing outward no more than 12 degrees.
Step 3: Keep your torso upright as you squat down into the bottom position. Your elbows should fall against your inner-thigh area as your knees track in line with your toes. Push through your midfoot, with a neutral chin, until you reach the top position to end the movement.

Bradford/Rocky Press

Knowledge drop: We have Olympic weightlifter Jim Bradford to thank for developing this fantastic exercise. You'll notice immediately that this move works on "time under tension" (TUT), and provides multiple ways to work your shoulders. Here's how and why we like to use it.
  • It can double as an excellent mobility drill.
  • It's a great shoulder warm-up for heavy pressing.
  • It activates all three heads of the deltoids along with the trapezius, rhomboids, and rotator cuffs.
Best SHOULDERS Exercises You're Not Doing!

Bradford Press Technique

Step 1: Walk up to the squat rack with the barbell placed just under your clavicle, or clean the bar if you feel confident enough. Use a grip wider than a typical overhead press (outside shoulder width) to allow for better movement and mobility throughout the exercise.
Step 2: Keeping your forearms vertical, push up the barbell until it reaches just above your head. As the barbell passes the top of your head, start to retract (adduct) the scapula and flare your elbows wide to bring the barbell behind your skull. Slowly drop your elbows to lower the barbell. Lower it only as far as the base of your skull before pressing and pronating (abducting) the scapula to bring the bar to the front and back to the beginning position.
Note: Don't go heavy with this exercise. Keep it light and be safe.

Otis-Up

The Otis-Up is an abdominal destroyer that will add some upper-body work to your routine. Maybe because it's got a foot in both camps, people are quick to dismiss it in favor of something that focuses squarely on one group or the other. But to us, it's another oldy but goody. Here's why.
  • It uses spinal flexion through the first half of the movement and spinal stabilization once you reach the top position.
  • It hits the abdominal muscles, obliques, and lower back (stabilizing at the top).
  • Because of the pressing motion, it works on the pectoralis major (sternal and clavicular), deltoids, lats, and more.
How to perform Otis Up - Abs Exercise Tutorial

Otis-Up Technique

Step 1: Lay in a supine position (face up) on the floor with your knees bent and feet anchored.
Step 2: Grab a weight—either a plate, dumbbell, barbell, or medicine ball. Start with the weight at your sternum and the back of your arms on the floor.
Step 3: As you crunch in your abs, flex your spine while pushing your hips and lower back into the floor. At the same time, press up the weight. Rolling your spine off the floor, keep your abs tight and let your shoulder joint extend until you reach the top position.
Step 4: When you're in the top position, your upper trunk should be vertical and your arms at full extension in line with your torso. Reverse the motion to bring yourself back to the starting position.

Drag Curl

The name itself sounds pretty cool and actually explains the movement very well. But are drag curls worth doing? Well, if you want to see growth in a particular muscle group—namely, the biceps—isolate it from other muscles that might help move the load. There are certain ways to really isolate a movement or muscle, and this old-schooler is one of 'em.
  • It takes out shoulder flexion and shoulder activation.
  • It eliminates momentum.
  • It forces you to utilize both a fuller range of motion and maintain stricter form.
How to Perform Drag Curl Biceps Exercise Tutorial

Drag Curl Technique

Step 1: Grab a barbell at shoulder width in the standing position.
Step 2: Slowly contract your biceps by flexing your elbow joints. Let your elbows move back as you curl up, using your body as a guideline for the bar to travel. The bar will "drag" up your body as you curl. Once you reach the top position, squeeze, and let down the bar slowly.

Scott Press

Good ol' Larry Scott. He was the first Mr. Olympia and one of the greatest, and he used this press developed by Vince Gironda to bring up his lagging shoulders. What sets this exercise apart from any other shoulder press is the fact that it takes the triceps out of the equation. Which makes sense, because if you know about Larry, you know he didn't exactly need bigger arms.
But, you might be asking, "How the hell do you take triceps out of a pressing exercise?" Well, you do it by focusing on the scapula retraction and elevation, not elbow extension. Here's what else this move has going for it.
  • The lateral and posterior deltoids are worked, along with the trapezius.
  • The lighter weight and short range of motion make relatively easy to master this move.
Larry Scott - Palm Out DB Press

Scott Press Technique

Step 1: Start in either a standing or seated position. Grab a pair of dumbbells and hold them out shoulder width in front of you with your arms at a 90-degree angle and your palms facing each other.
Step 2: Start retracting your scapula and flaring your elbows out to the side of your torso, while at the same time elevating your scapula until you reach peak contraction.
Note: This movement should feel fluid and natural, so start with a very light weight to get the hang of it.

Stomach Vacuum

The vacuum is a technique many old-school bodybuilders used, supposedly to help keep their waists small. Because the vacuum exercise focuses on strengthening the transverse abdominis muscle (TVA), this may actually be true. The TVA helps stabilize the spine and holds the abdomen in tight. The vacuum is nicknamed "the corset muscle" because it keeps those waists narrow. Old dudes knew what was up.

Stomach Vacuum Technique

Step 1: You can perform this movement seated, standing, or on all fours facing downward. They're all great.
Step 2: Exhale all the air out of your lungs. Expand your chest and visualize touching your belly button to your spine. Hold for 10 seconds, or make it fun by seeing how long you can last (without passing out, that is).

Floor Press

This one is definitely an old schooler. In fact, the floor press was the initial exercise that eventually evolved into the very well-known bench press. There are a couple key differences between the floor press and the bench press.
One difference (obviously) is that you do floor presses on the floor, which creates a shorter range of motion (ROM). The shorter ROM works the upper half of the push while simultaneously taking out the leg drive. No leg drive means stricter upper-body push through the chest, triceps, and shoulders. It has other benefits, too.
  • More triceps involvement can help you increase your triceps size and strength.
  • The floor press will also improve your bench-press lockout.
  • It minimizes stress on your shoulders.
Best CHEST Exercises You're Not Doing

Floor Press Technique

Step 1: Lie on the floor, feet extended flat, with the barbell racked on a squat cage just above you at arm's length.
Step 2: Unrack the bar and slowly lower until the backs of your upper arms rest on the floor. Then explosively press up to the top position.

Dumbbell Pull-Over

This exercise has a long history, full of ups and downs. Back in its heyday, pull-overs got props in one way or another from every well-known bodybuilder from the golden era. It was credited with expanding bodybuilders' ribcages to create those famous herculean chests, and also for generating massive upper-body skin-tearing pumps in both the chest and lats.
But the excitement eventually died away for this poor exercise, and today, the pull-over largely just a memory. Let's not let it fade into obscurity! Here's some of what makes this classic move great:
  • It's a great way to work on your upper-body flexibility, specifically the shoulders and thoracic spine.
  • It'll help you develop your pectoralis major (sternal head), posterior deltoids, latissimus dorsi, and triceps. It also hits plenty of small but important muscles like the teres major.
  • It'll give you a damned good upper-body pump.
How to Perform Dumbbell Pullovers - Chest Exercise

Dumbbell Pull-Over Technique

Step 1: Lie crossways on a bench. Take a dumbbell with a diamond grip, holding the inner far side of the weight at arms' length directly above your chest.
Step 2: Take a deep breath as you flex your shoulders and allow the weight to move back and behind your head, bending your elbows as much as necessary. Stop when you feel the stretch in your lats, chest, and/or triceps.
Step 3: Once you reach the full stretch position, exhale as you use shoulder extension to pull the weight back over to the starting position.
Note: Not every dude or gal has the mobility and flexibility to make this move work right out of the gate. Take it light and take it slow to feel out your range of motion.

Friday, December 02, 2016

5 Simple Steps to Make Fat Loss Faster and Easier

Matt Dutile/Image Source/Getty Images

Have you tried every diet on the planet, but you still can't seem to lose weight regardless of how hard you work out or how hard you try? If that's you, then forget everything you've ever learned about losing weight. Substitute all that past thinking with five simple metabolism-boosting tricks that will help you melt belly fat faster.

It's all about the speed of your metabolism. Your diet makes up 90 percent of your weight-loss success, while your workouts make up the final 10 percent. Not seeing results? It's time to turn up the heat in your body to rev up your metabolism, jump-starting your weight loss and busting through that plateau.

Let's back up for a moment. You need to learn what your metabolism is and how it works. Just for the record, your metabolism isn't the enemy that it's made out to be. In fact, it's your best ally when it comes to losing weight.

Metabolism is the process in which your body converts what you eat and drink into energy. That energy is either burned off or stored as fat. The number of calories your body uses to complete these functions is known as your metabolic rate. Your metabolic rate can be affected or slowed by the following factors that make losing weight almost impossible:

* Stored excess fat around your belly, hips and thighs
* Approaching, currently in or post-menopause
* Lacking muscle tone
* Sleep deprived
* Eating too much of the wrong kinds of foods and not enough of the right kind of foods
* You exercise too much or too little or, even worse, do the wrong kind of exercise
* You are genetically predisposed to a slow metabolism and gain weight quickly

In addition, you probably already know that being female and over 40 (this can affect men too) means your metabolism is slowing down every year. It takes a significant step backwards every five years due to muscle loss and hormones. Our thyroids begin to tire and slow down as well. When combined with life issues, chronic exhaustion and stress, it creates the perfect storm for weight gain.

But there's more hope than you think, and you have a lot more control over the speed of your metabolism than you realize. These five metabolism-boosting strategies will work every time, no matter how old you are or how sluggish your metabolism is.

Step 1: Eat all your meals within a 10- to 12-hour window every day. This sets up a fat-burning atmosphere in your body and allows it to detoxify each night. This is not only great for persuading your body to use stored fat for fuel, but also for antiaging. You should eat between the hours of 8 a.m. and 7 p.m. for best results.

Step 2: Exercise first thing in the morning on an empty stomach. Your body is naturally primed for fat-burning first thing in the morning. This escalates weight loss and makes it easier to melt fat. Metabolic exercise is more effective when free weights are used because they work the entire body and contain 10 to 12 multijoint exercises.

For maximum fat-loss results, complete two to three sets of each exercise in the metabolic circuit in superset fashion, with little or no rest in between sets. Allow at least one day in between sets, and perform three workouts a week. Lift as heavy as you can while still maintaining proper form. You don't need to work to fatigue. In fact, it's suggested that you don't, so that you don't affect the fat-burning process.

Step 3: Kick-start your metabolism with a whey protein shake after your workout. This will recalibrate your appetite and switch your cravings to "off." Thermogenic eating also creates heat in your metabolism, which is exactly what you want.

The simplest way to do this is to replace your current breakfast with a metabolism-boosting smoothie 12 hours after your last meal. This blocks cortisol from rising, making it easier to lose belly fat.
It's important that you look for a whey that is high quality, micro-filtered and contains very few carbs, sugars and less than five grams of fat. Ideally, this complete protein shake will contain 155 calories, 24 grams of whey protein, less than 15 grams of carbohydrates and be almost void of sugar and fat. This nutritional profile is best because it starves the fat so it gets burned off, but feeds the muscle so it gets replenished and nourished. 

Step 4: Eat thermogenically to rev your metabolic engines. Certain foods slow the metabolism while others speed it up. These thermogenic foods are the best when it comes to speeding up your metabolism. Trade in your chicken breast for white fish, and replace the starch on your plate with a leafy green vegetable. Watch the pounds drop quickly.

Fish good for you,  but the lighter and whiter the fish, the better it is for your metabolism. Keep in mind that just because a fish is good for you doesn't mean it's good for weight loss. Portions still count.

Step 5: Eat more fiber. Your weight-loss efforts get derailed due to hunger and cravings that are caused by blood sugar fluctuations that can occur when you change your diet. As if that wasn't bad enough, you can become bloated due to constipation. Eating fiber can help keep you feeling full without filling you out and help relieve constipation and bloating.

While we can't control our gender, age or genetics, we can control how and what we eat as well as how we exercise. Most of the time it's not what we know that stops us from losing weight but what we don't know. This prevents us from achieving our weight-loss and fitness goals. But now that you know, are you ready to give your metabolism a boost?

--Lisa

Wednesday, November 30, 2016

The 4 Myths of Happiness (And how they’re leading you into a trap…)

What’s the last line of every fairy tale? You got it: ‘. . . and they lived happily ever after.’ And it’s not just fairy tales that have happy endings. How about Hollywood movies? Don’t they nearly always have some sort of feel-good ending where good triumphs evil, love conquers all, and the hero defeats the bad guy? And doesn’t the same hold true for most for most popular novels and television programs? We love happy endings because society tells us that’s how life should bshould be: all joy and fun, peace and contentment, living happily ever after. But does that sound realistic? Does it fit with your experience of life? This is one of the four major myths that make up the basic blueprint for the happiness trap. Let’s take a look at these myths, one by one.” Dr Russ Harris from “The Happiness Trap”

Welcome to Chapter 1: “Fairy Tales.” The myths of happiness that get us caught in the happiness trap. Let’s take a quick look:

“Myth 1: Happiness Is the Natural State for All Human Beings.” Russ makes the point throughout the book that our minds evolved 
over the last 100,000 years (and millions before it) as a “Don’t get killed” device—in charge of finding every little thing in our environment that may threaten our lives. We aren’t hardwired to write poetry and giggle as much as we are to stay alive. When we think it should all be sunshine and roses and eternal bliss, we’re in for challenges. 

“Myth 2: If You’re Not Happy, You’re Defective.” By extension of the first myth, we tend to think that if we’re not happy all the time something is inherently wrong with us. But that’s just not accurate. We evolved to be highly sensitive to the negative. If you’re not happy, nothing is wrong with you per se. Your psychological discord is an inherent facet of being human. Of course, there are ways to navigate the negative with more grace, but telling yourself that something is wrong with you because you’re not happy every single moment is not helpful.

“Myth 3: To Create a Better Life, We Must Get Rid of Negative Feelings.” Good luck with that! To function as flourishing human beings pursuing meaningful goals, we need to embrace the full spectrum of emotions. Big goals—whether that’s having a thriving long-term relationship, raising healthy kids, or creating a business—bring feelings of excitement and enthusiasm AND feelings of stress, anxiety, doubt and frustration. It’s not about *getting rid* of those negative feelings, it’s about being able to expand to make space for them while living in integrity with your values. More on that in a moment.

“Myth 4: You Should ALWAYS Be Able to Control What You Think and Feel.” Although we can influence our thoughts and feelings and select our responses to them, we can't control whether or not we feel them . There’s a big difference there. Most self-help books tell us that if we just think enough positive thoughts, we can control how we think and feel. That’s an unhelpful happiness trap. Again, we evolved over a very long period of time to automatically think and feel negative stuff.

Those are the four myths of happiness that form the foundation of The Happiness Trap. We need to quit struggling against human nature—making ourselves wrong for failing to be happy all the time and for not controlling every thought and emotion.


Tuesday, November 29, 2016

5 Workouts That Burn More Calories Than Running


by COLLETTE STOHLER Last Updated: Nov 15, 2016

Most of us don’t have the time (or patience) to log hours on the treadmill or elliptical each day. Fortunately, short bursts of high-intensity work followed by brief periods of recovery can burn just as many calories as steady-state cardio, but in less time. It’s called high-intensity interval training (HIIT). The best part is that these workouts can usually be completed in 30 minutes or less!

HIIT not only burns a large amount of calories in a short period of time, but it can also result in EPOC, or excess post-exercise oxygen consumption. This means that you’re still burning calories after you’ve finished training.

In fact, you’re burning approximately six to 15 percent more calories than during steady-state cardio. Imagine: Working out, and then still burning calories while you’re stuck at the office, watching your kid’s soccer game or even sitting on the couch.

But since HIIT training is physically intense, it’s recommended that you only do these kinds of workouts a few times a week. For each workout, make sure you warm up beforehand and cool down afterward. Get ready to burn, baby, burn with these five calorie-burning, fat-busting workout

.
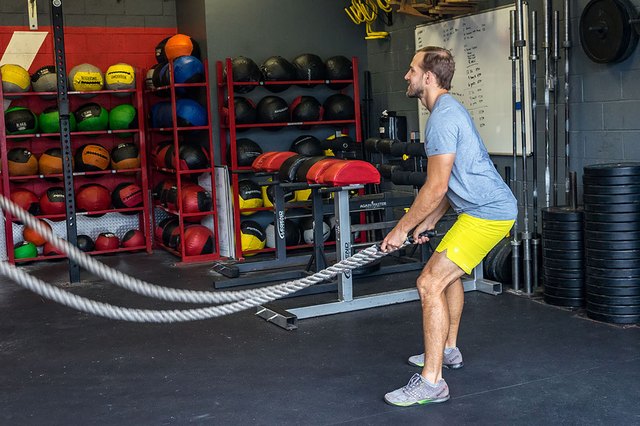
Be prepared to do battle (ropes). Photo Credit Collette Stohler/LIVESTRONG.COM

1. Tabata Trimmer

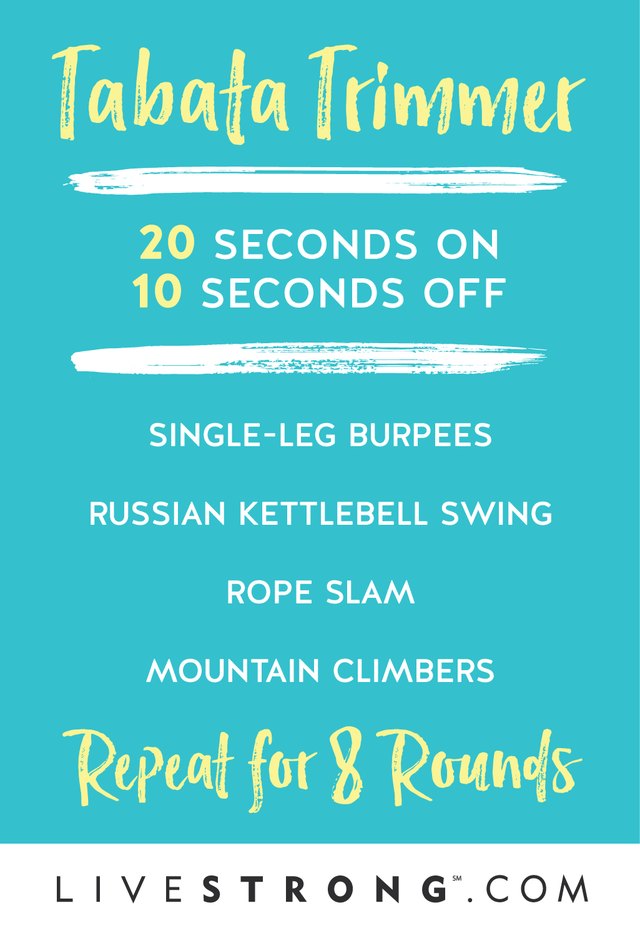
Tabata training involves eight rounds of 20 seconds of work followed by 10 seconds of rest. That means you’re only actually “working” just over 2.5 total minutes for each exercise, but you’re still burning a ton of calories. The trick is to give it everything you’ve got for each 20-second bout of work.

Do each exercise for 20 seconds, rest 10 seconds, and then move to the next exercise. Perform eight rounds.

Single-Leg Burpees
Stand on your left leg. Bend down and place your hands on the ground. Jump your feet back into a single-leg plank and perform a single-leg push-up. Hop your feet up to your hands. Stand up and jump up off your left leg. Repeat on the other side.

Russian Kettlebell Swings
Start by holding a kettlebell with both hands. Hinge at your hips and swing the kettlebell between your legs, and then swing it up to eye level.

Rope Slams
Grab the ends of a battle rope in each hand and sit back in a squat. Raise your arms up above eye level as you stand up. Lower down into a squat as you quickly lower your arms and slam the rope on the ground.

Mountain Climbers
Start in a high plank. Quickly alternate bringing your left knee toward your left armpit and then your right knee toward your right armpit.

Give this Tabata workout your all! Photo Credit LIVESTRONG.COM
 
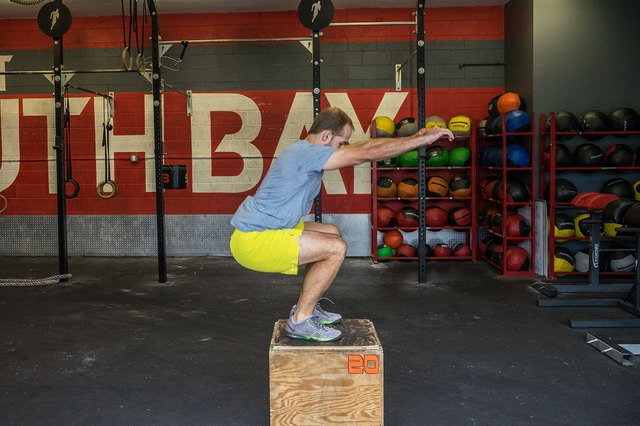
With plyo, you'll really feel the burn. Photo Credit Collette Stohler/LIVESTRONG.COM

2. Plyo Power

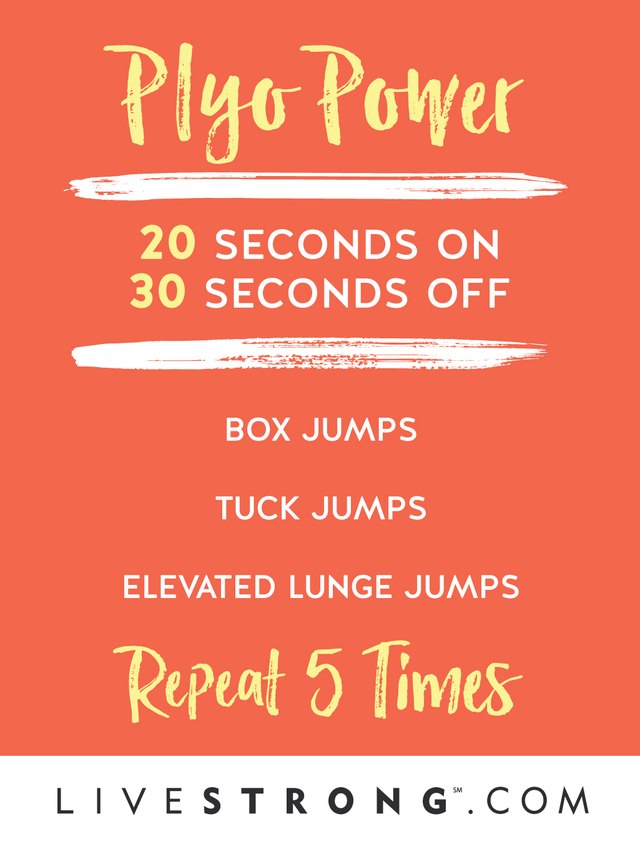
This workout is all about power! Plyometrics, or jump training, will increase your heart rate and push your anaerobic threshold. Just make sure your joints are free of injury (especially your knees) and that you’re in fairly good shape before attempting.

Do each exercise for 30 seconds, rest for 30 seconds, and then move to the next exercise. Do this five times total.

Box Jumps
Choose a box you can comfortably jump up onto with both feet. (Try 24 inches for men and 20 inches for women.) Standing six to 12 inches in front of the box. Bend your knees and load your hips. Jump up, swinging your arms forward and raising your knees. Land on the box, stand up, and then step down.

Tuck Jumps
Start by standing with your feet hip-width distance apart. Bend your knees slightly and jump upward, driving your arms up to shoulder height and bringing your knees to your arms. Land and explode off quickly with elasticity.

Elevated Lunge Jumps
Stand in front of a box or bench with one foot on top of it so that your knee is bent at a 90-degree angle. Explode off of one foot by jumping upward and aggressively swinging your arms up for added momentum. Switch legs in the air and repeat.

This plyo workout is tough but doable. Photo Credit LIVESTRONG.COM
 
Squats — the single best exercise for your backside. Photo Credit Collette Stohler/LIVESTRONG.COM 

3. Booty Burner

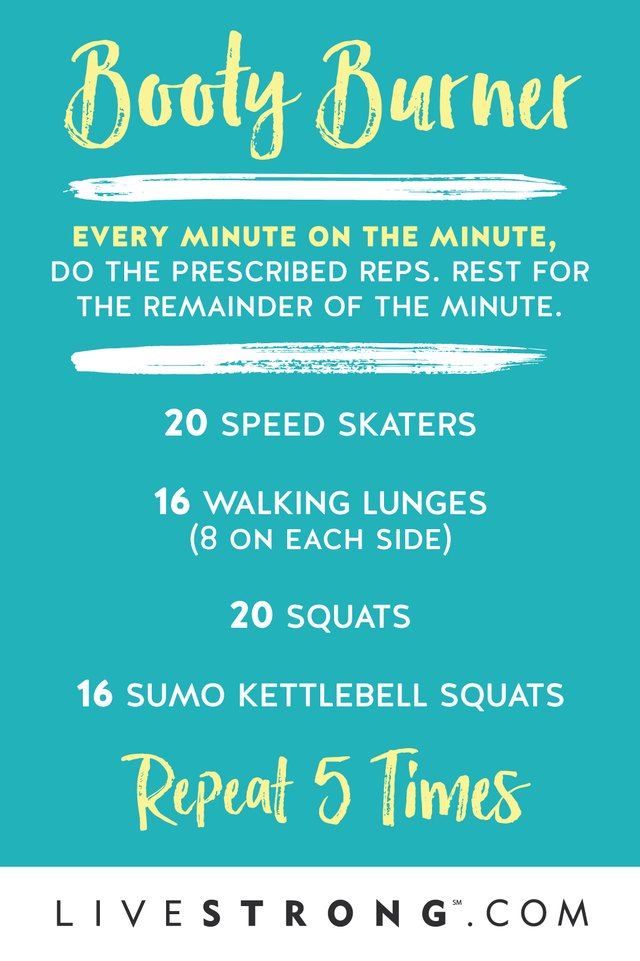
For buns of steel, follow this EMOM — a workout that involves working every minute on the minute. Once you’ve finished the prescribed reps, rest for the remainder of that minute.

At the start of each minute, do the listed number of reps for each exercise. For example, to start, do 20 speed skaters, and then rest until the next minute starts. Then move to 16 walking lunges. Go through the list of exercises five times.

20 Speed Skaters (10 each side)
Stand on your right foot with your knee slightly bent. Jump a few feet to your left side and land on your left foot, bending your left knee and touching the ground with your right hand. Continue hopping back and forth.

16 Walking Lunges (8 on each side)
Start with your feet hip-width apart. Step forward, lowering your back knee to the ground while keeping your front knee at a 90-degree angle. Stand up and step forward with your opposite leg.

20 Air Squats
Start with your feet shoulder-width apart. Lower into a squat, keeping your back straight and your core tight. Drive your knees out as you push off the ground and stand up.

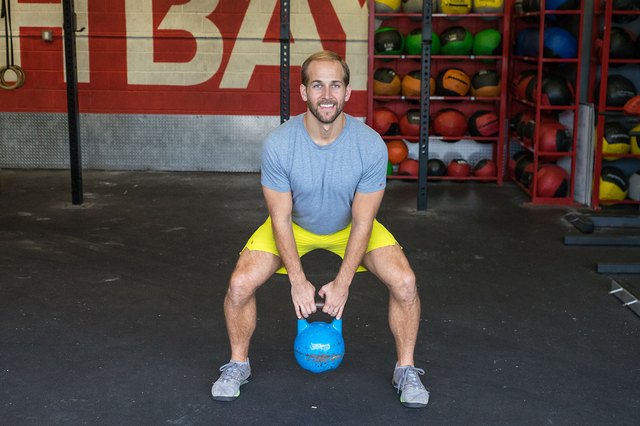
16 Sumo Kettlebell Squats
Stand with your feet wider than shoulder-width apart and turn your toes out as wide as possible. Hold a kettlebell or dumbbell in your hands and lower down into a sumo squat so that the weight touches the ground. Keep your back straight as you push off the ground. Stand up and repeat.

It's called the Booty Burner for a really good reason. Photo Credit LIVESTRONG.COM
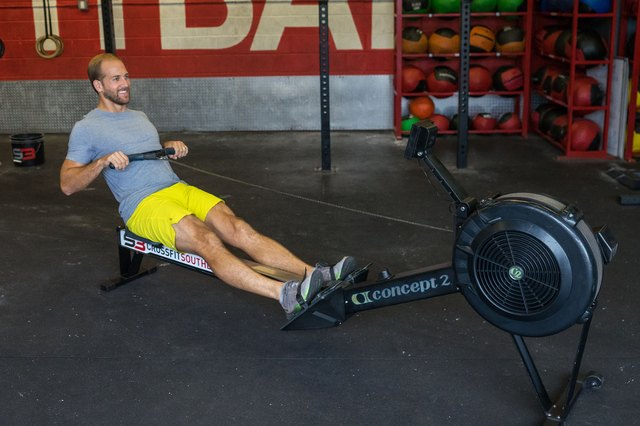
Don't let the rower collect dust. Photo Credit Collette Stohler/LIVESTRONG.COM

4. Cardio Crush

For all the cardio lovers out there, rejoice in the fact that you can get your heart pumping and burn calories without spending hours on the cardio machine.

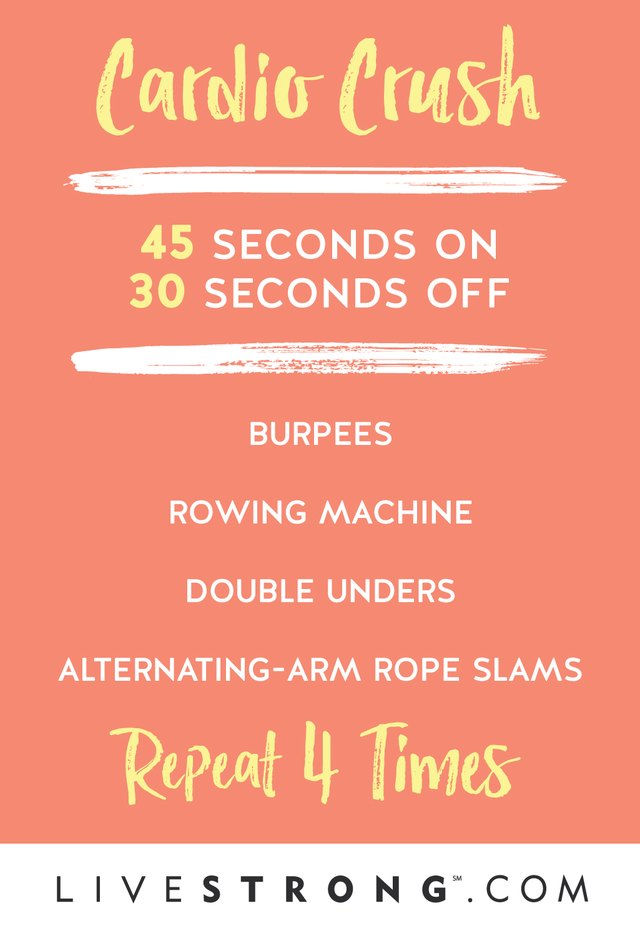
Do each exercise for 45 seconds, rest for 30 seconds, and then move to the next exercise. Repeat the circuit four times total.

Burpees
Start with your feet hip-width apart. Bend your knees and place your hands on the ground. Jump back to a plank and do a push-up. Jump your feet to your hands. Stand up and jump off the ground, clapping your hands over your head.

Row for Calories
Use a rowing machine, placing your feet in the hooks and your hands on the handle. Push away with your legs, as you pull the handle toward your chest as if you're rowing a boat. Then let momentum (and the recoil of the rope) pull you back to the starting position.

Double Unders
Jump rope, allowing the rope to pass under your feet twice as you’re up in the air.

Alternating Rope Slams
Stand with your feet shoulder-width apart and the end of a battle rope in each hand. Lower into a slight squat as you alternate raising and slamming your ropes with each arm.

Crush those calories! Photo Credit LIVESTRONG.COM
 
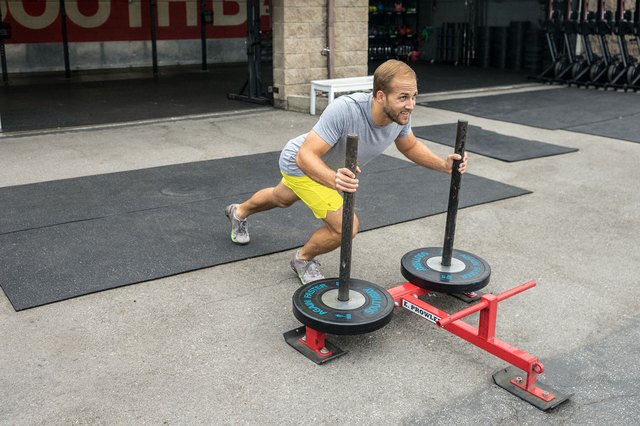
Push it. Push it real good! Photo Credit Collette Stohler/LIVESTRONG.COM

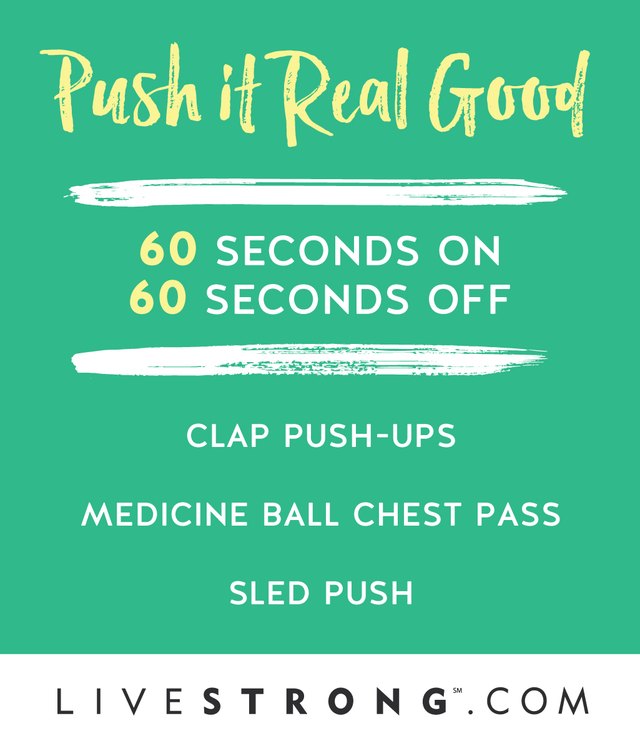
5. Push It Real Good

This workout involves push training, or exercises that require a push motion. With strength and cardio exercises wrapped into one workout, you’ll get a full-body cardio workout without ever having to step on a machine.

Do one minute of each exercise, and then rest for one minute. Repeat for a total of five rounds.

Clap Push-Ups
Start in a high plank. Lower your chest down to the ground and explode off the ground, clapping your hands underneath your chest.

Medicine-Ball Chest Pass
Stand four to five feet away from a wall, place your feet hip-width apart and hold a medicine ball in your hands. Throw the medicine ball against the wall, catch it on the rebound and repeat.

Sled Pushes
Load a sled with enough weight to challenge you, but an amount that’s light enough for you to push without stopping. Lean your body forward and drive your knees up as you push the sled in front of you.

A workout to make Salt-N-Pepa proud. Photo Credit LIVESTRONG.COM


Monday, November 28, 2016

The Rock’s Secret Weapon For Building Muscle


Dwayne ‘The Rock’ Johnson revealed a surprising training tool in a recent Instagram
BY STEPHANIE LEE
November 17, 2016

dwayne the rock johnson

Dwayne Johnson, a.k.a. The Rock, is known for his Herculean dedication to the gym and for sharing his brutal workouts with his 70+ million Instagram followers. Recently he posted a picture of his expansive back, but the curious thing was what hung from his right hand.

The Rock is holding a chain. No, he’s not about to tow something. Lifting with chains is an old-school way to boost your strength and see new gains.


Chains can weigh up to 60 pounds. They can make strength exercises more effective by making key parts of a move harder and other parts easier, says JC Deen, a personal trainer from Nashville, Tennessee.
Let’s say you’re performing the bench press. You’d hang a chain off each end of the bar, adding extra weight to it.
But here’s where it gets interesting: As you lower the bar to your chest, the chains pile on the ground, essentially “removing” some of the weight—the bar is now lighter. As you press the bar back up, you “pick up” the chains with it, so the bar becomes successively heavier the higher it travels.
Most people are weakest at the bottom of the bench and get stronger the higher the bar is off their chests, especially during the final lockout phase of the lift, says Deen.
So the chains allow you to use just the right load throughout the lift: more resistance in your strongest areas and less in your weakest, helping you gain more strength and muscle.
The bench press is just one example.
Chains can be used in any exercise where the weight feels lighter as you get closer to the lockout phase of the exercise, such as squats, deadlifts, or military presses, Deen says. You can also use them to add extra weight to pullups.
Training with lifting chains can also help improve your core stability. Oftentimes the chains sway as you lift, so you have to engage your stabilizing muscles to control the weight.
Want to try it? You can buy chains that are designed specifically for training—like this one—which usually have a clasp or a mechanism to secure them to the barbell. They come in various thicknesses, lengths, and materials, all of which modify their weight.


If Your Goal Is Fat Loss, Why Shouldn't Your Training Focus More On Cardio Than Weights?

by Tom Venuto

Q: If your primary goal is fat loss, shouldn't you just focus on cardio and hold off on the weight training? I've heard that you can't gain muscle when you're in a calorie deficit, so if that's true, why bother lifting at all - why not just follow your diet and do cardio and then start lifting later? 

A: This is a very common question and always an area of great confusion. I believe that's because the answer is somewhat counter-intuitive. It's obvious that weight training helps build muscle, but most people don't realize how much lifting helps to burn fat nor do they consider the huge list of fitness and health benefits that come from lifting. Most people associate cardio with burning fat and weight lifting with building muscle, so if the goal is fat loss, on the surface it doesn't seem like lifting weights would be the priority.

Adding to the confusion is the fact that you don't gain maximum muscle when you're in a calorie deficit, so many people wonder if lifting would be a waste of time when you’re cutting calories. The truth is quite the opposite. Weight training is the best kind of training you can do when you're working towards for fat loss. Although you may not build a lot of muscle when your calories are reduced below maintenance, weight training is absolutely vital for keeping the muscle you already have.

Weight Training: Vital for Maintaining Muscle While Cutting Calories: Without weight training, your risk 
of losing lean body mass while dieting in a deficit is greatly increased. If you lose muscle, your metabolic rate drops and this begins a downward spiral where your body composition actually gets worse and it gets harder and harder to continue losing more fat at the same rate. Also, it's important to know that it is possible to develop muscle when you're in a calorie deficit for fat loss, you simply won't gain muscle at the maximal rate. But, you won't gain muscular body weight - it requires a calorie surplus for that.

It's challenging to gain muscle and lose fat at the same time, except for: 1. Beginners, 2. People with good (mesomorph) genetics, 3. People using enhancements, 4. People who lost muscle and are just regaining it (muscle memory). Furthermore, it usually requires a special type of "body re-composition" program where weight training is combined with a cyclical diet that alternates between short periods of calorie surplus and calorie deficit (not a continuous deficit). The net effect over an extended time is increased muscle and decreased fat.

But, just because you're unlikely to gain maximal muscle while pursuing fat loss - at least not muscular size or body weight, that doesn't mean you shouldn't be weight training. By weight training during a fat loss program, you will develop muscle in the form of a harder, firmer, more shapely physique and you will avoid the dreaded "skinny-fat" syndrome that happens to so many people when all they do is diet and cardio or diet alone. 

Assuming your goal is better body composition (less fat and more muscle), if you could only do one type of training, it should be weight training (or resistance training of some kind). Resistance training is the number one most important type of training for improving your body composition. If your time is limited, the ideal strategy is to make weight training your first exercise priority, and fit in cardio as time allows, preferably intense cardio, which is the most time efficient. You would depend primarily on your nutrition to achieve the deficit for fat loss.

Weight Training Burns A Lot Of Calories! Calorie Burning = Fat Loss: Here's what most people seeking fat loss don't consider when they think about weight lifting: Cardio is not the only way to burn calories. All exercise burns calories, and the more intense the exercise, the more calories you burn in a given time. If weight training is intense and uses big muscle group compound exercises, it can burn a lot of calories - sometimes even more than cardio!

Moderate and intense cardio can burn a lot of calories as well, so both types of training - resistance training and cardio training - help burn fat. You should stop thinking that only cardio is for fat loss and start thinking that burning calories is for fat loss. Regardless of the type of exercise, if you burn more calories and that increases your calorie deficit, you will lose more fat.

The difference between cardio and weights is that weight training gives you many fitness and body composition benefits that cardio can't.

Cardio does not help you retain your lean body mass; in fact too much cardio in a deficit with NO weight training can increase risk of muscle loss, so without weight training your body composition could get worse while dieting, not better.

It's also best to look at nutrition as the primary driver of fat loss. Weight training is the number one exercise priority, while cardio is second in importance. Adding cardio on top of a good nutrition and weight training program will increase your calorie deficit even more, so you could look at cardio as a "fat loss accelerator," but not necessarily the main engine.

When you think about weight training, it will help you appreciate how beneficial it is when you consider all the benefits, both for improving body composition and fitness/overall well-being.

Body Composition Benefits of Weight Training: Increases lean body mass, improves your body shape and appearance, even if you don't gain pounds of lean mass, makes your muscles firm (cardio and diet alone can give you a "skinny fat" look where you weigh less but your physique is soft and mushy), maintains lean body mass when you are eating in a deficit for fat loss, decreases sarcopenia (loss of muscle that occurs automatically with age if you don't counteract it), burns a lot of calories, especially if you use compound big muscle group exercises like squats, presses, deadlifts, lunges and rows, and keep rest periods brief, increases metabolism acutely after the workout (most people believe the "afterburn" effect only comes from cardio, but weight training can also increase metabolism for hours after the workout is over), increases basal metabolism (if you gain significant amount of lean body mass, this increases the calories you burn at rest)

Fitness and Health Benefits Of Weight Training: Increased muscular strength, increased strength of connective tissue and tendons, resistance to injury (during sports, recreation and everyday living), increased bone density, cardiovascular improvements - not only blood lipid improvements but reduced blood pressure, increased self-confidence and self-esteem, improved quality of life and independence especially with age, longer life, improved cognitive function, increased flexibility (weight training through a full range of motion makes you more flexible, not less so, "muscle-bound" is a myth).

I'm sure the list of benefits could go on even further, this is just what I could think of off the top of my head. Bottom line: Weight training and cardio training work well together for fat loss as well as all-around fitness and health, and the ideal program uses both. But weight training is exercise priority number one, even when your primary goal is fat loss. Unless you're training for endurance sports, never put cardio or aerobic training above weight training.


Tuesday, November 22, 2016

4-year-old girl in heartbreaking photograph dies of cancer

Something more must be done to save these children from this. It is absolutely gut wrenching to see a young life endure the agony and then be taken from us like this. 

A British girl seen by thousands in a heartbreaking photograph that her father said showed "the darkness that is childhood cancer" has died, he announced in a Facebook post. Jessica Whelan, of Clayton-le-Moors, England, was 4.

4-year-old girl in heartbreaking photograph dies of cancer